A novice in DMR can struggle to set his Duplex MMDVM Hotspot to work correctly in the duplex mode with his radio to be able to monitor simultaneously two different talkgroups (TG).
I was also struggling with my Duplex MMDVM Hotspot Support C4FM/DMR/DSTAR P25 With Raspberry Pi 2B+ and my Radioddity GD-88 DMR radio.
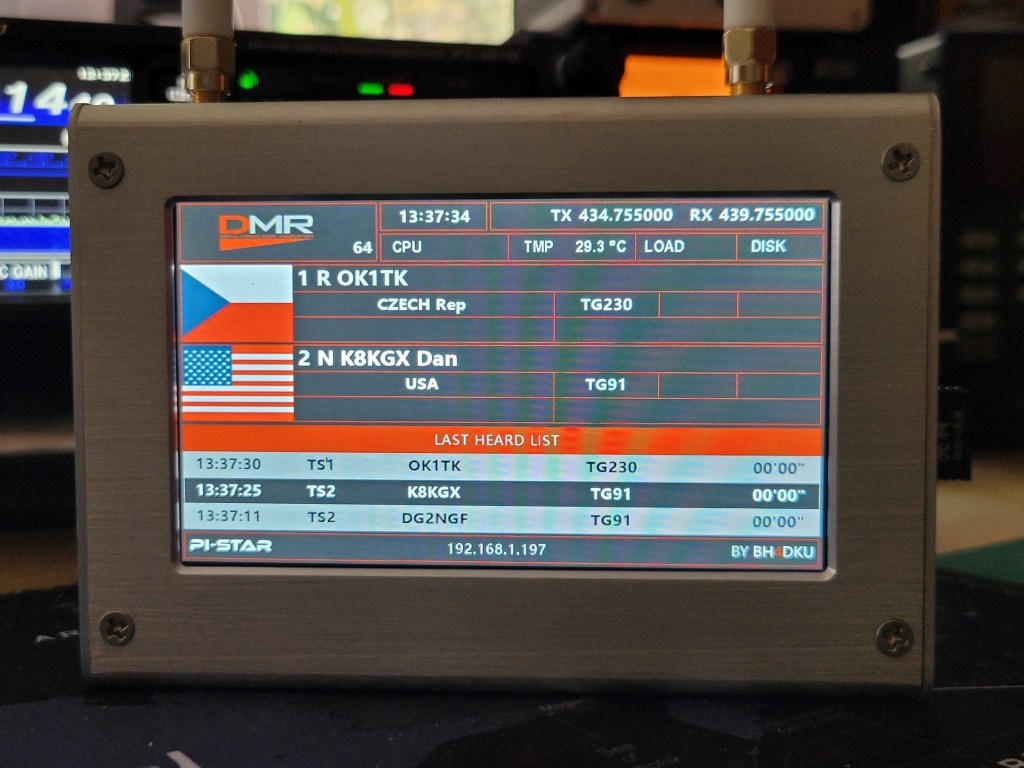
Therefore I decided to create an easy step by step setup to help to achieve the same state as you can se in the picture above. The picture shows how I monitor the WorldWide TG91 and simultaneously TX in TG230.
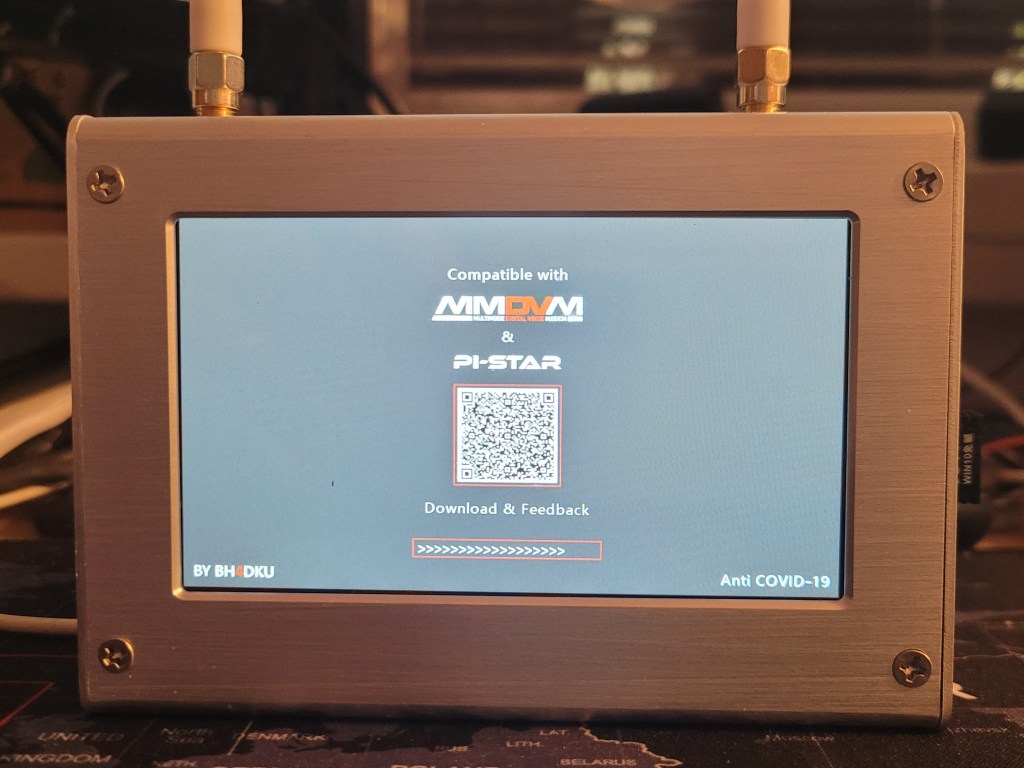
The manual on eBay where I order my hotspot says how to connect to the hotspot. You can see the detail of the manual on the first picture below. Unfortunately the Wifi connection didn’t work in my case. The only screen I saw on my hotspot’s display is captured on the second picture below. Therefore I decided to connect to the hotspot via a LAN cable.

CONNECT / LOGIN
Connect the hotspot to your computer via a LAN cable and type the this address into your browser:
| Address: | http://pi-star |
you should see the screen as on the picture below. If you seen a Sign in dialog use the login information below. If not click on the Configuration in the top right menu and use the login information below.
| Login: | pi-star |
| Password: | raspberry |
Once you are logged in you should see the a page similar to the page on the picture below. You can see your current Pi-Star version in the top right corner on the screen. You should use the current version. If needed you can use the Update link form the menu below or if you are struggling with the update as it was in my case, you check the link: here: https://ok1tk.com/duplex-mmdvm-hotspot-support-c4fm-dmr-dstar-p25-with-raspberry-pi-2b/
Here we can start to configure the hotspot to be used in the simplex or duplex mode.
THE HOTSPOT CONFIGURATION – DUPLEX MODE
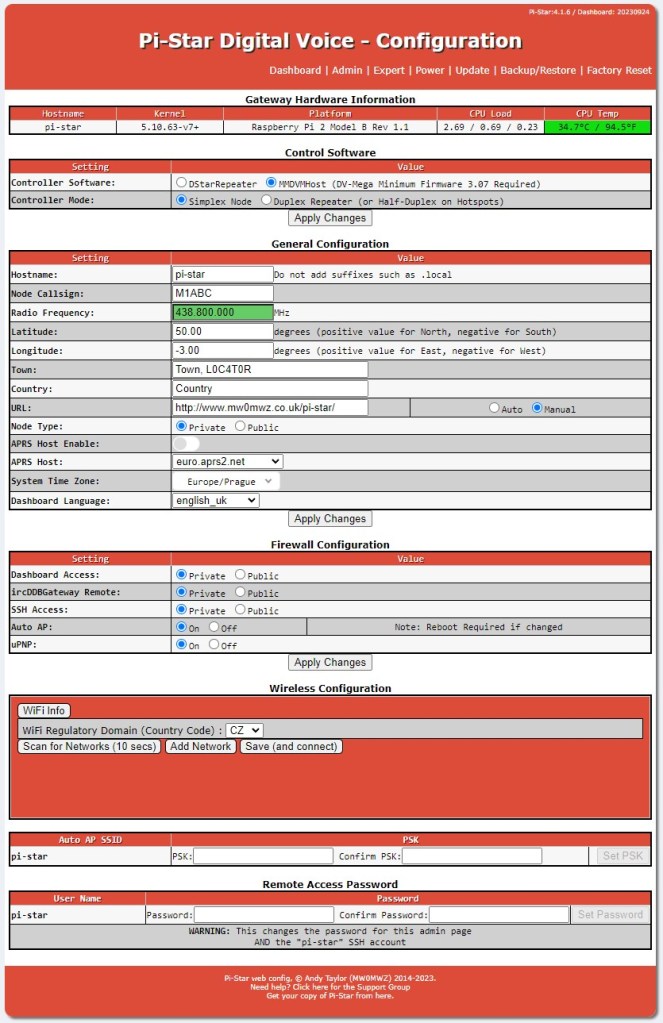
1. Gateway Hardware Infromation
This part shows the information about your hotspost hardware information as you can see on the picture:

2. Control Software
To set your hotspot to the duplex mode you should set the following items as it is desribed below . Then click the Apply Changes button:

| Controller Software: | MMDVMHost (DV-Mega Minimum Firmware 3.07 Required) |
| Controller Mode: | Duplex Repeater (or Half-Duplex on Hotspots) |
3. MMDVMHost Configuration
The MMDVMHost Configuration part was not originally visible and appeared after applying changes. In this part we will set the bellow items:
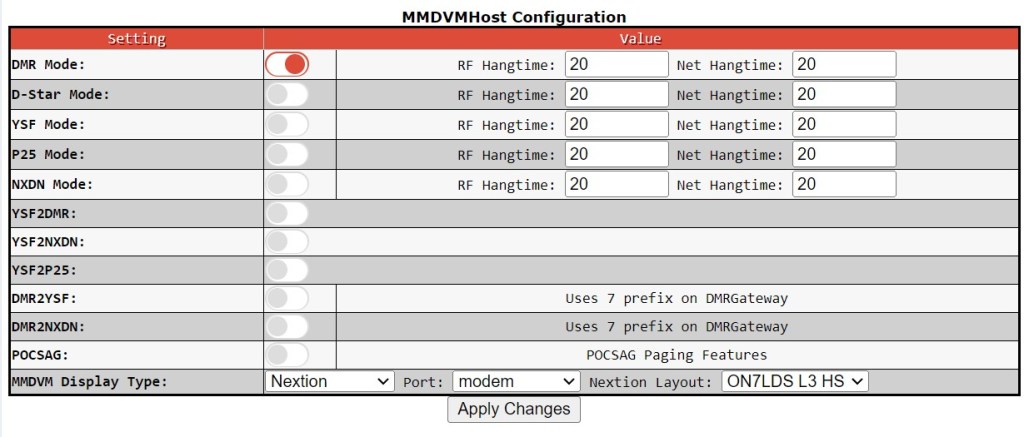
| DMR Mode: | On |
| MMDVM Display Type: | Nextion |
| Port: | modem* |
| Nextion Layout: | ON7LDS L3 HS |
You can keep the other items as they are as it was at least in my case. *) If I remember well the original Pi-Star version provided with my hotspot was set to /dev/ttyAMA0. After the Pi-Star version update I couldn’t got only other screen then the „booting“ screen with the QR-code. I played little bit with the setup and found that it works correctly with the port set to modem.
4. General Configuration
Once you have applied the changes in the step Control Software you can see that the General Configuration part slightly changed beside the picture above.
This part is very important to set your RX & TX frequencies, your DMR ID, callsign, location etc. Regarding setting correctly RX & TX frequencies you should refer to to your local band plan and I was recommended to set at least 5MHz split between RX and TX.
Please refer also here how to correctly set the frequencies.
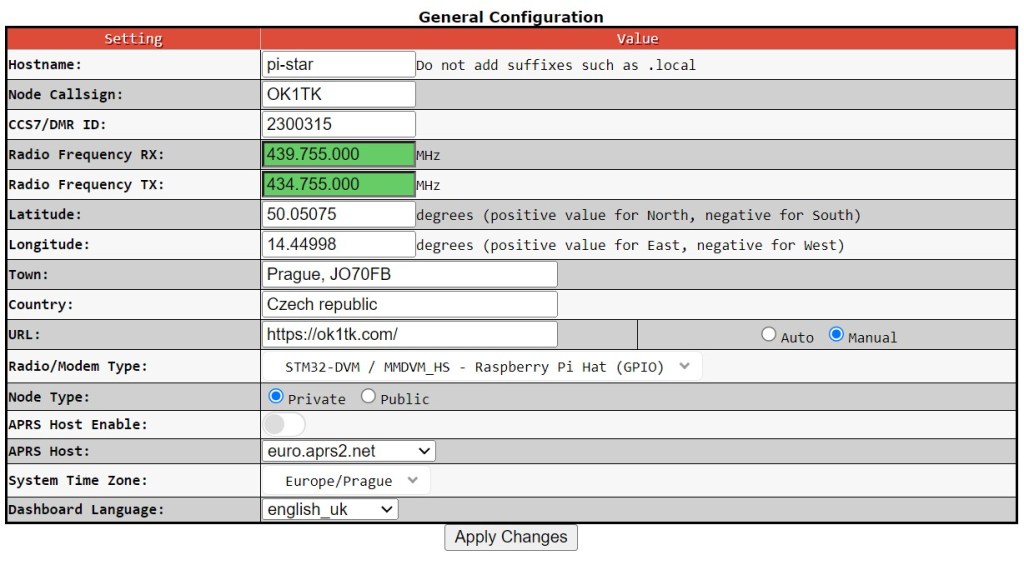
| Hostname: | pi-star |
| Node Callsign: | „You callsign“ (my case: OK1TK) |
| CCS7 / DMR ID: | „Your DMR ID“ (my case 2300315) |
| Radio Frequency RX: | e.g. 439.755.000 MHz (see here) |
| Radio Frequency TX: | e.g. 434.755.000 MHz (see here) |
| Latitude: | „Your latitude“ (my case: 50.05075°) |
| Longtitude: | „Your longtitude“ (my case 14.44998°) |
| Town: | „Your town“, you can add e.g. LOC GRID |
| Country: | „Your country“ |
| URL: | Your web page URL (e.g. https://www.qrz.com/db/OK1TK) |
| Radio / Modem Type: | STM32-DVM / MMDVM_HS – Raspberry Pi Hat (GPIO)* |
| Node Type: | Private |
| APRS Host Enable: | OFF (you can set ON if you want to use APRS) |
| APRS Host: | Select appropriate host for your location |
| System Time Zone: | Select appropriate time zone for your location |
| Dashboard Language: | You can use your local language for dashboard, if available |
*) It is very important to select correct Radio / Modem Type. In case you have different device then me you should pick the correct one.
5. DMR Configuration
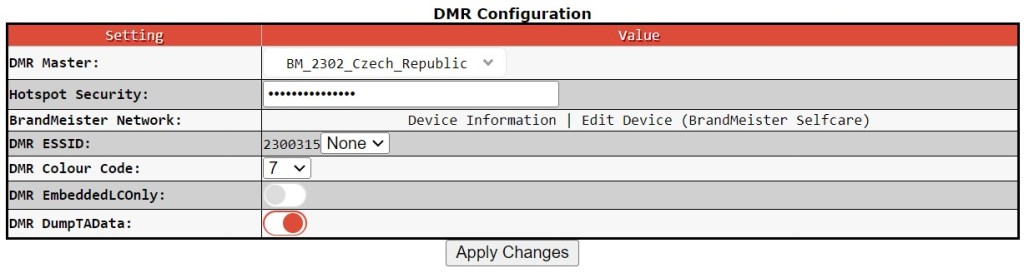
| DMR Master: | Pick your prefered DMR Master from the list |
| Hotspot Security: | Insert you Hotspot Security password* |
| BrandMeister Network: | Use the links to get/edit your BM setup |
| DMR ESSID: | Any of the numbers from the dropbox. I picked 07 |
| DMR Colour Code: | Pick your Colour Code here** |
| DMR EmbeddedLCOnly: | OFF |
| DMR DumpTAData: | ON |
*) Hotspot Security: Log into your BrandMeister account (you can use the Edit Device (BrandMeister Selfcare) link under the BrandMeister Network item to log in.
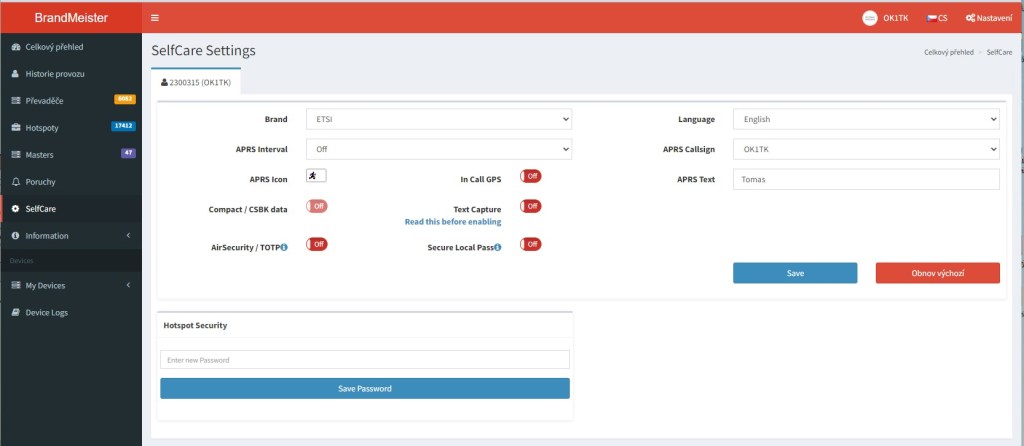
When you are logged use the SelfCare link in the left menu and then choose and fill your password to the field in the Hotspot Security part. Then click Save Password. (See the picture of the BM Self Care section above).
**) I choosed the colour code 7 to avoid the mostly used colour codes 0 and 1.
6. Mobile GPS Configuration
I do not use the mobile GPS now therefore I left the setup in default as you can see on the picture below.

7. Firewall Configuration
If you want to use your hotspot to be used as Access Point in case you are out of your WiFi network to set a new WiFi network you should use the setup as described below and click Apply Changes button. I haven’t tested it yet so I can’t add more details now.
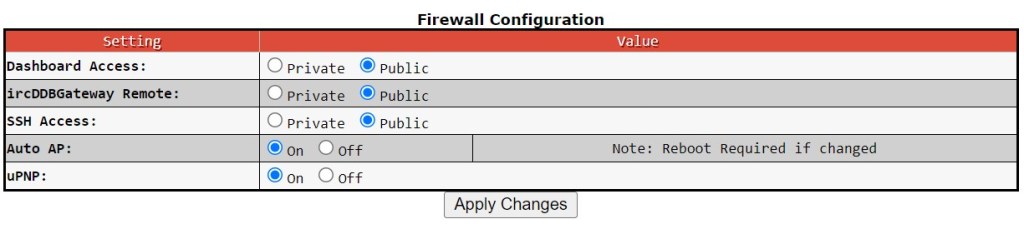
| Dashboard Access: | Public |
| ircDDBGateway Remote: | Public |
| SSH Access: | Public |
| Auto AP: | On |
| uPNP: | On |
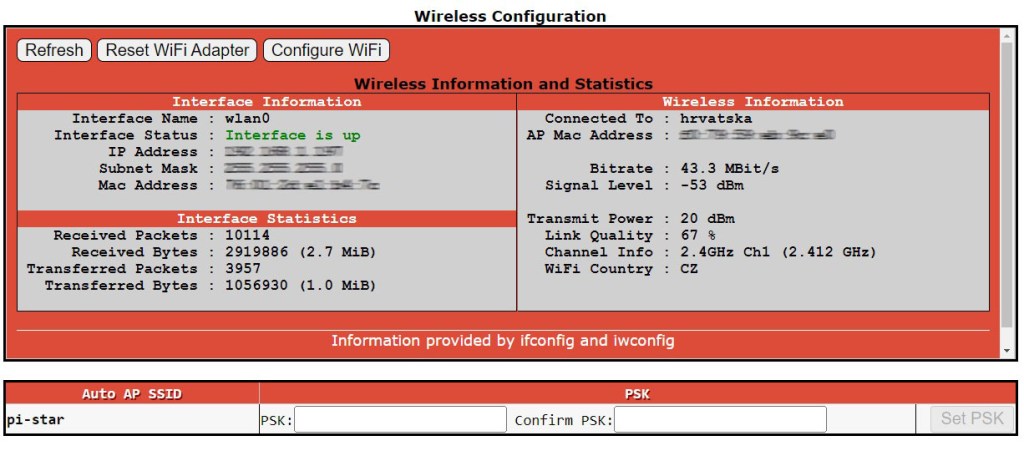
8. Wireless Configuration
When first time setting the connection to your WiFi you should see the window as below with two options. You can add your WiFi manually by using Add Network button or scan for existing networks by using the Scan For Networks button.
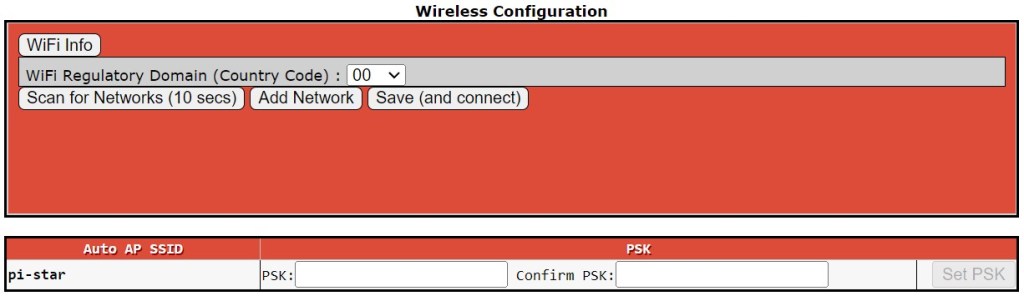
When choosing the Add Network option you should manually insert your WiFi SSID and password and then click Save (and connect) button.
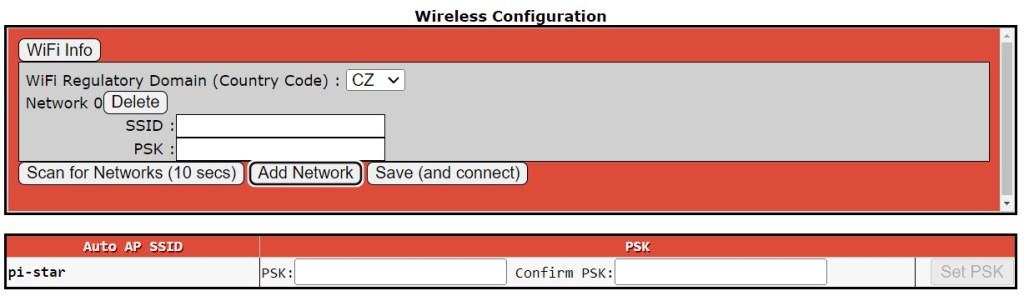
When choosing the Scan for Networks option you should wait till the list of available networks appears. Then you can select your preferred WiFi network and insert your password.
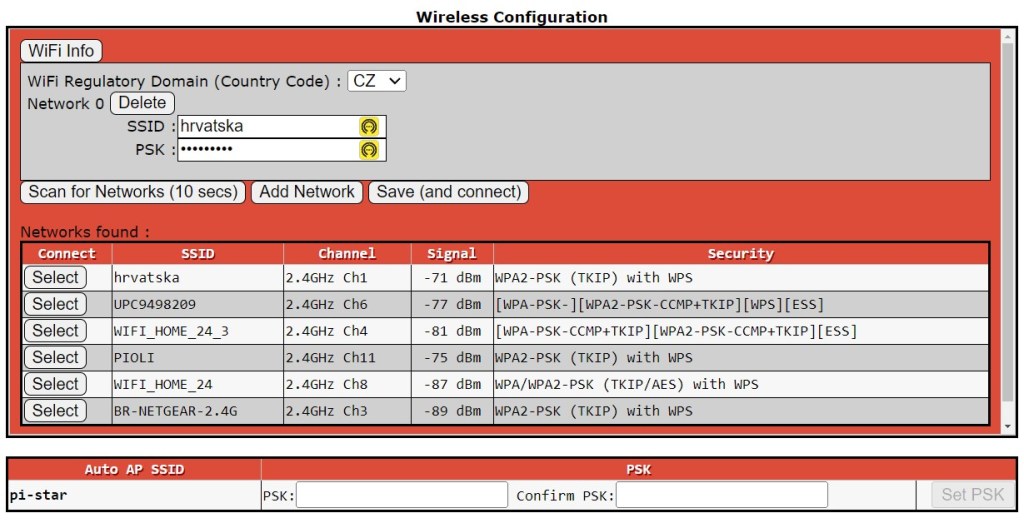
Once your are connected to your network you should see similar information as on the picture below.
This is all now regarding the hotspot setup. Leťs make a short look how to setup your radio. In this case the Radioddity GD-88.
RADIODDITY GD-88 SETUP
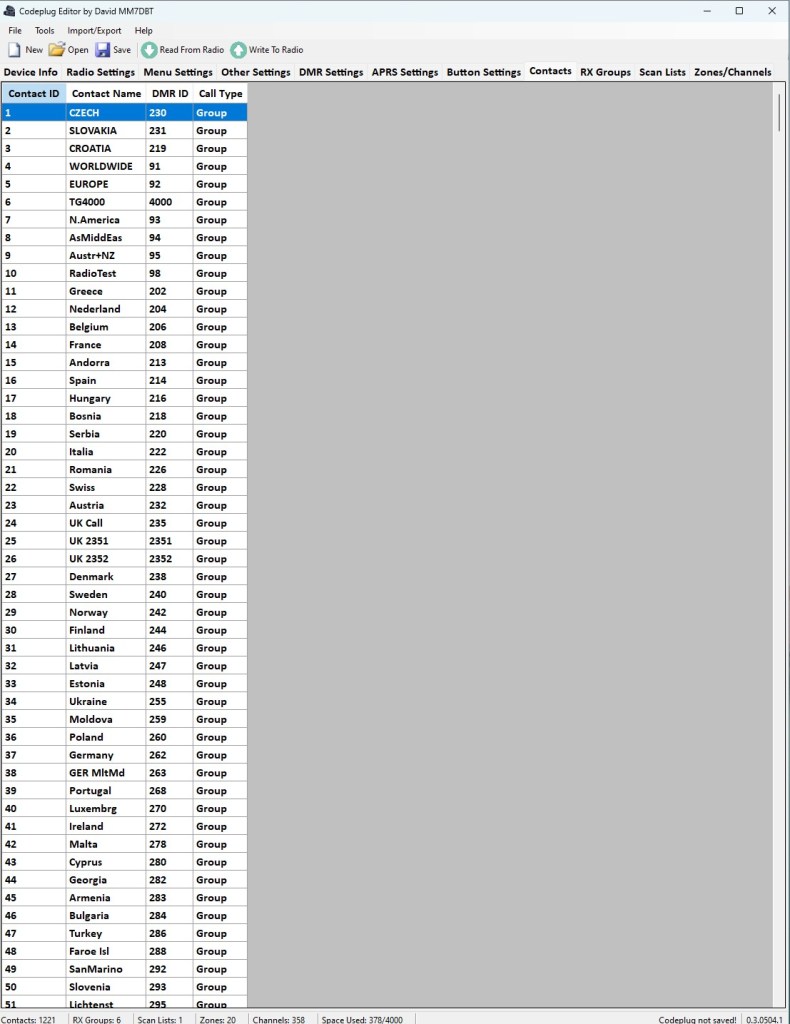
I use the CPE MM7DBT (Codeplug Editor by David MM7DBT) to configure and backup my Radioddity GD-88. I assume you have already set your radio basics and Contacts, RX Groups and Zones/Channels for the use in simplex mode or via repeaters. Therefore I will just show shortly show in the pictures below my setup to inspire and show what works for me.
My Contacts settings
My RX Groups Setup
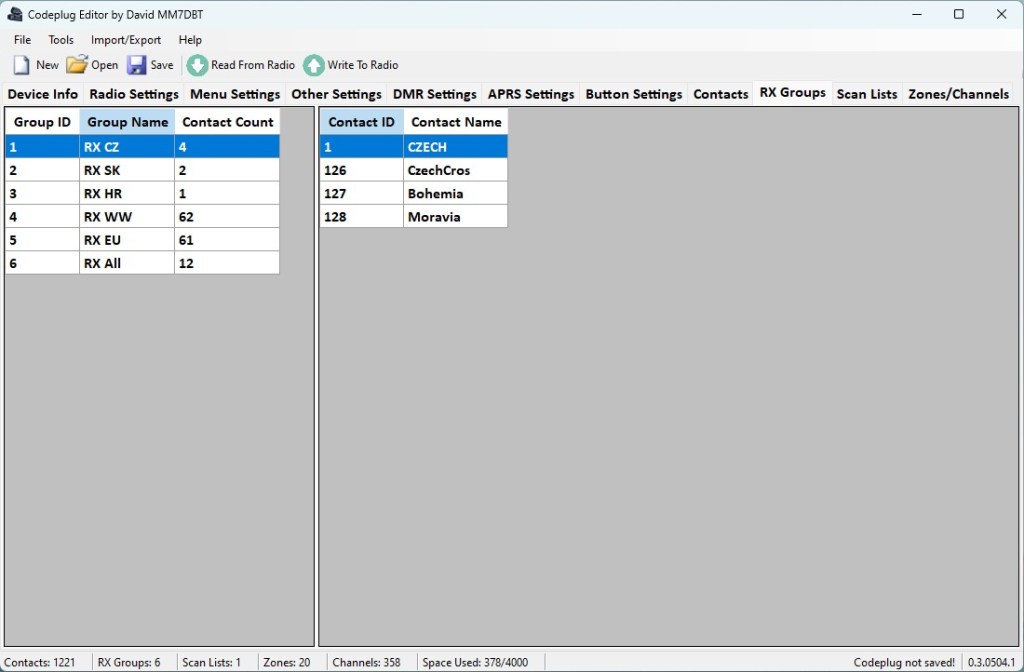
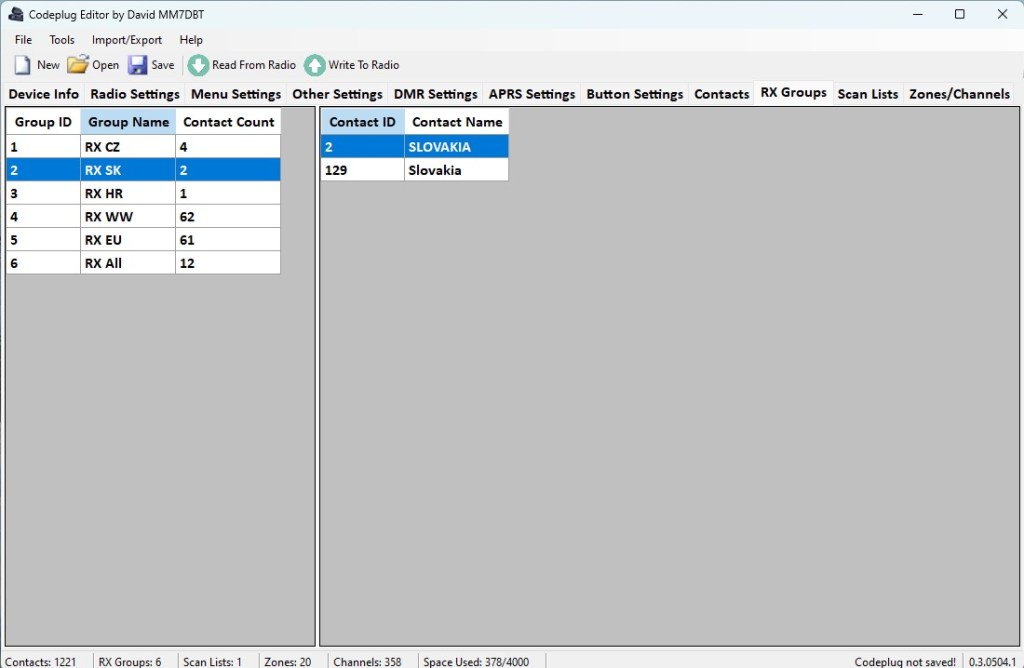


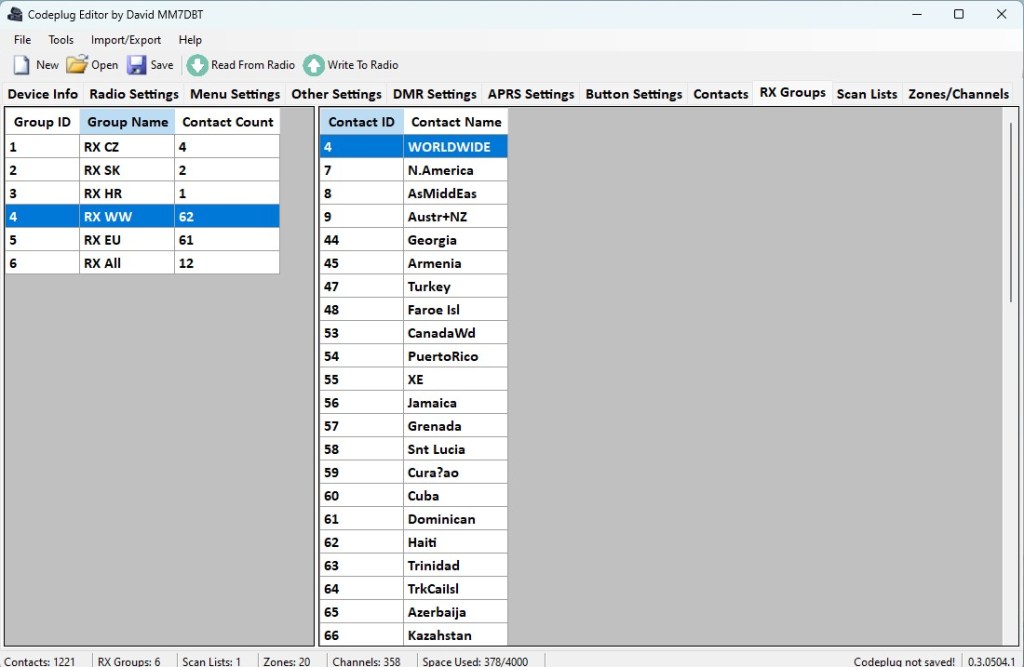
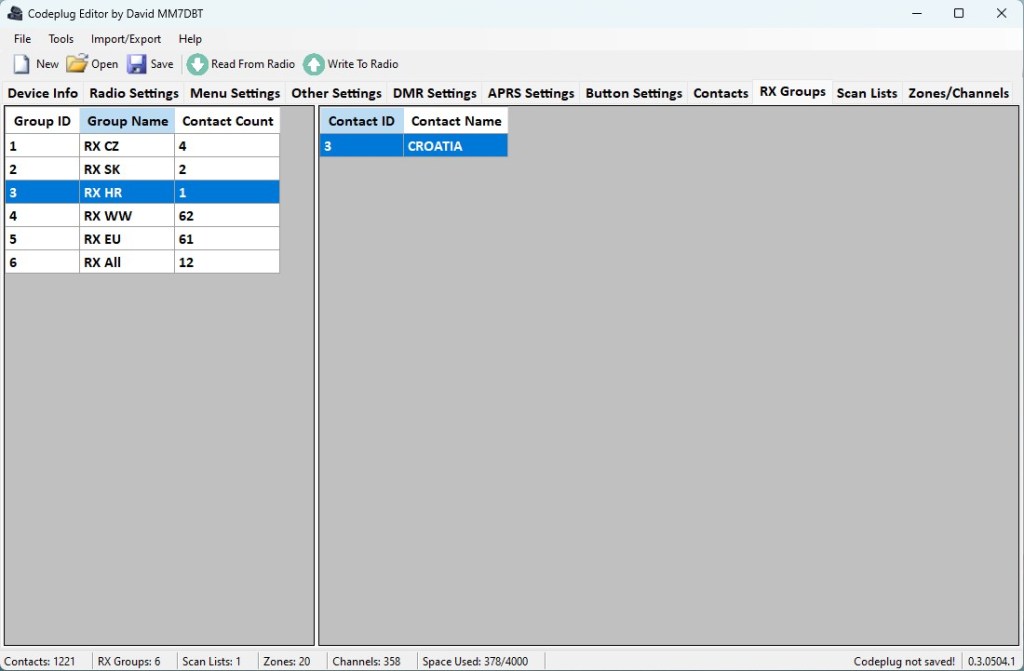
This is definitely not the final setup of RX Groupsand I will play with the radio setup in the future.
Zones/Channels setup
This is the most important part to setup your Radioddity GD-88 for duplex use. I created one specific Zone dedicated just for the duplex mode and put all the Talk Groups (TG) currently interesting for me into this specific Zone. As you can see on the picture below I inserted each TG twice to this zone. Once with the Time Slot 1 (TS1) and once with Tome Slot 2 (TS2) to be able to use different combination of the TGs. E.g. monitor the WW TG 91 using TS2 and the local CZECH TG 230 using TS1.
Very important is to set correctly the Rx Freq and Tx Freq as I already mention above. Please, refer here to see how to setup the frequencies.
Please do not forget to set correctly your RX CC and TX CC. It must be equal to the DMR Colour Code set in the part 5. DMR Configuration above on this page.

The other settings like Contact, Rx Group should be set according to your Contact and RX Groups setup.
SETTING THE RX & TX FREQUENCIES FOR THE DUPLEX MODE
A little bit confusing part for me was to set the correct frequencies to work in duplex mode. It is a different way than setting the repeater’s frequencies where the reaper’s downlink frequency is equal to your RX frequency set on your radio and the repeater’s uplink frequency is equal to the TX frequncy set on your radio.

As you can see on the picture above your RADIO RX frequency should be set the same the same as the HOTSPOT TX frequency and the RADIO TX frequency should be set the same as the HOTSPOT RX frequency.
In other words where your radio listens your hotspot should transmit and opposite where your radio transmits your hotspot should listen.
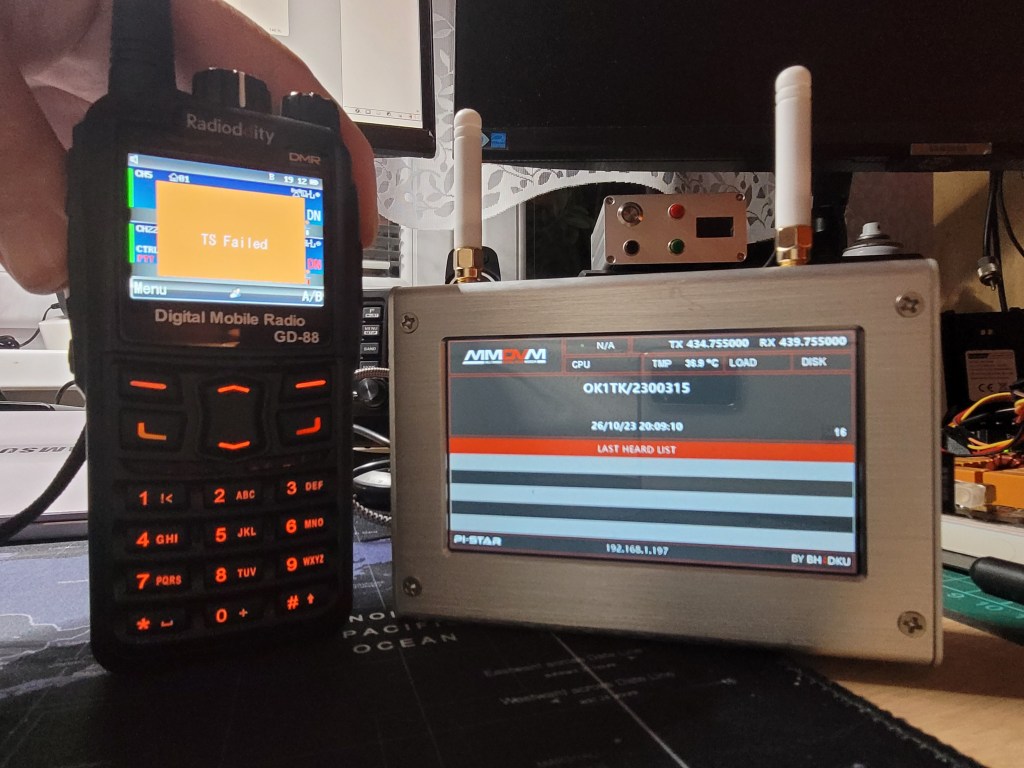
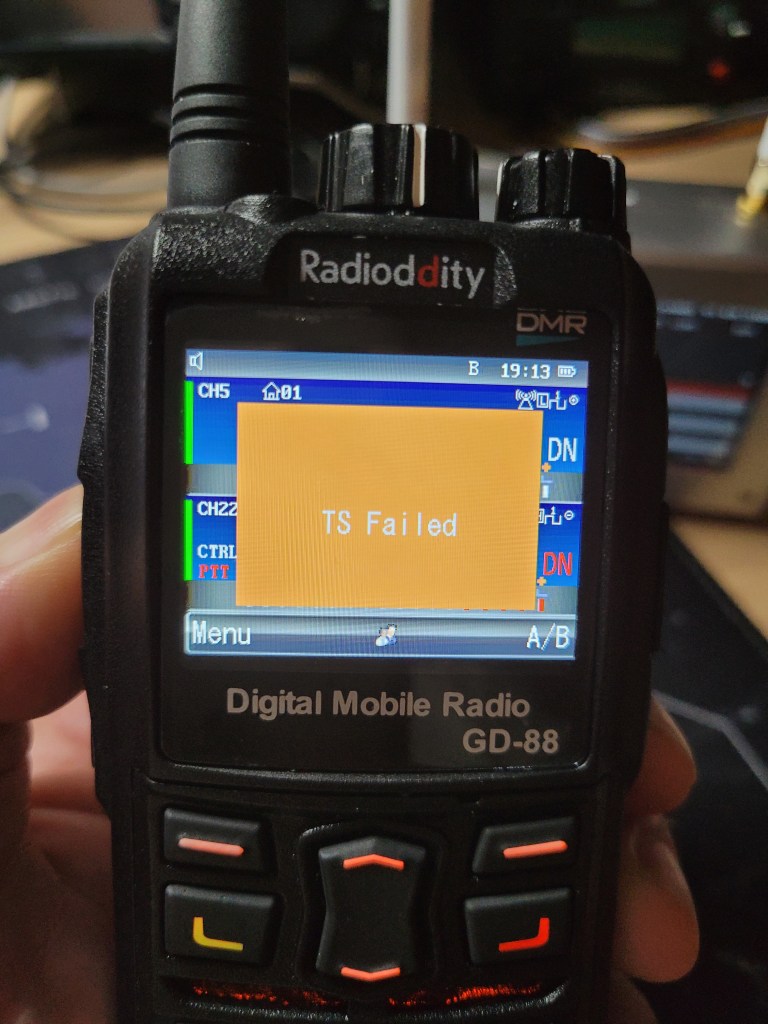
If you setup is correct but you receive an error message on your radio you might mismatched the RX and TX frequencies and your radio does not receive any response from your hotspot.
You can see the TS Failed error message on my Radioddity GD-88 below.
If you are struggling with the setup please refer to this Facebook group when I get a lot of help: Pi-Star Support Group
Interesting links:
